When shooting on a clean white background, many photographers assume they must add background lights.
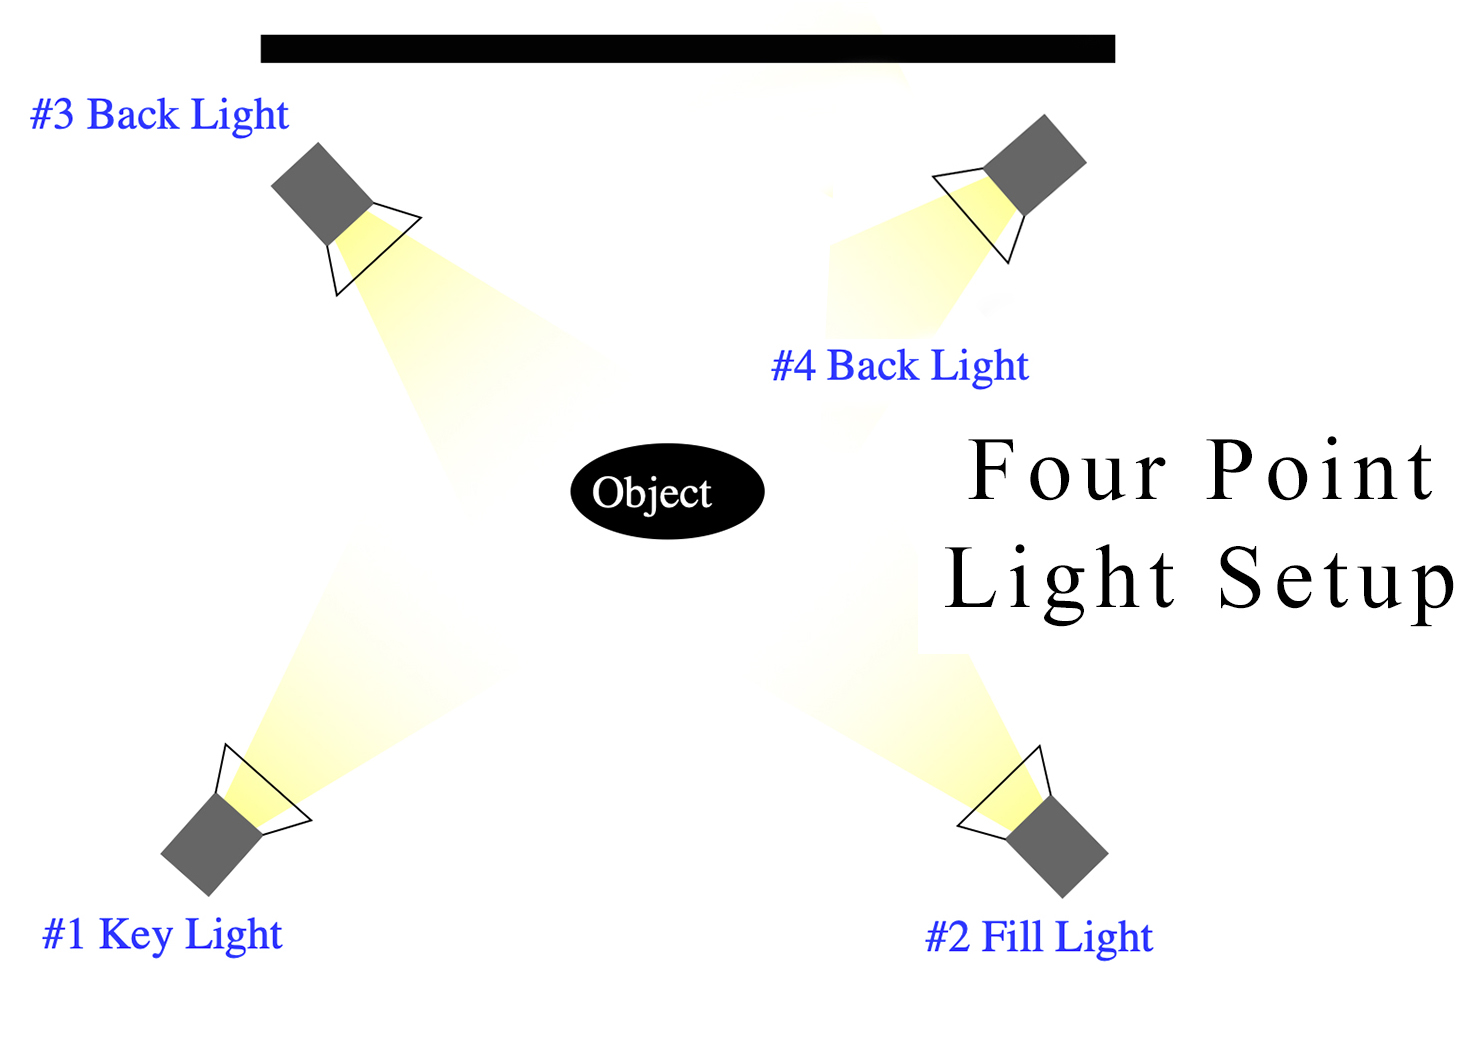
But if your goal is a natural white background (not pure blown-out high key), you can absolutely use a four-point subject lighting setup only — exactly like the diagram above.
This setup is perfect for:
- Corporate headshots
- Catalog photography
- Clean branding portraits
- E-commerce
- LinkedIn profile photos
Let’s break it down clearly and practically.
1️⃣ Key Light – The Sculptor
Role: Main shaping light
Placement: 45° to subject, slightly above eye level
The key light defines:
- Facial structure
- Texture
- Mood
For white background portraits:
- Use a softbox (large modifier) for smooth skin tones
- Keep it about 3–5 feet from subject
- Meter this as your base exposure (example: f/8)
This is your strongest light.
2️⃣ Fill Light – Shadow Controller
Role: Softens shadows created by the key
Placement: Opposite side of key, slightly lower power
You don’t want flat lighting.
You want controlled shadows.
Set fill about:
- 1 to 2 stops lower than key
- Example: Key = f/8
- Fill = f/5.6 or f/4
For corporate work, keep fill softer and subtle.
For dramatic portraits, reduce fill further.
3️⃣ Back Light (Hair / Rim Light – Left)
Role: Creates separation from white background
Placement: Behind subject, angled toward hair/shoulder
This is critical when shooting white backgrounds.
Without rim lighting:
- Dark hair blends into white background
- Shoulders lose definition
- Image looks flat
Use:
- Strip softbox or gridded light
- Slightly higher than subject
- Power about 1 stop below key
4️⃣ Back Light (Hair / Rim Light – Right)
This is what makes it a true four-point setup.
Role: Balanced separation on both sides
Placement: Mirrored opposite side of back light #3
Now your subject is:
- Fully sculpted
- Separated
- Dimensional
- Professional-looking
This creates that polished studio look you see in:
- Magazine portraits
- Corporate websites
- Clean brand shoots
Why No Background Light Is Needed?
Because:
✔ White background reflects light naturally
✔ Your key and fill spill enough light onto it
✔ Proper subject-to-background distance keeps it clean
Important:
Keep subject at least 4–6 feet away from background.
This:
- Prevents shadows
- Prevents overexposed halo
- Keeps background evenly white
If you expose properly, the background will look clean without needing extra lights.
Exposure Strategy (Professional Tip)
Let’s say:
- Key: f/8
- Fill: f/5.6
- Back lights: around f/6.3
Meter for the face.
Do NOT meter for the background.
If you want pure white (255 white):
You’d need background lights.
But for clean commercial white, this four-light setup is enough.
When This Setup Is Ideal
As a photographer (especially for branding, weddings, or corporate work), this setup gives you:
- Clean skin tones
- Strong separation
- Controlled shadows
- Consistency across sessions
It’s efficient and repeatable — which is important when running professional shoots.
Common Mistakes
❌ Subject too close to background
❌ Back lights too strong (creates blown hair highlights)
❌ Fill too strong (kills depth)
❌ No modifiers on rim lights (creates harsh edges)
Final Thought
Four-point lighting for white background is about control, not brightness.
You are not lighting the background.
You are sculpting the subject so beautifully that the white background becomes effortless.
If you’d like, I can also:
- Create a power ratio cheat sheet
- Give exact Profoto/Godox settings
- Show how to do this in a small home studio
- Or explain how to convert this to high-key commercial style
Just tell me what you’re shooting next 📸